Oblivion:Miscarcand (place)
|
|||
|---|---|---|---|
| # of Zones | 3 | ||
| # of Welkynd Stones | 18 | ||
| # of Varla Stones | 1 | ||
| Occupants | |||
| Bitterfish Goblins, Undead, King of Miscarcand |
|||
| Important Treasure | |||
| 1 Great Welkynd Stone 1 boss-level Ayleid Coffer 4 boss-level Ayleid Reliquaries 1 boss-level Chest 02 |
|||
| Console Location Code(s) | |||
| MiscarcandExterior02, Miscarcand01, Miscarcand02, Miscarcand03 | |||
| Region | |||
| West Weald | |||
| Location | |||
| West of Skingrad, northeast of Kvatch | |||
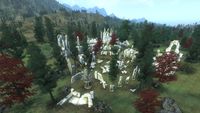
Miscarcand is a medium-sized Ayleid ruin between Skingrad and Kvatch containing goblins and undead (quest-related). It contains three zones: Miscarcand, Miscarcand, Sel Vanua, and Miscarcand, Morimath.
Related Quests[edit]
- Miscarcand: Recover a Great Welkynd Stone for Martin.
Notes[edit]
- Although it is possible to explore this entire ruin before starting the associated quest, it is strongly recommended that you do not do so. Retrieving the Great Welkynd Stone prematurely triggers a serious glitch in the main quest (as detailed under the Miscarcand quest).
- This location also appears in Oblivion Mobile.
- The final section of Miscarcand where you encounter the King of Miscarcand is called Miscarcand, Morimath. In ESO, Beragon reveals that the King's name was Morimath.
Bugs[edit]
- Some of the Ayleid doors may not open when activated.
- The Official Oblivion Patch, version 1.1.511, fixes this bug.
Exterior[edit]
- The exterior is located at coordinates: Tamriel -28, 0
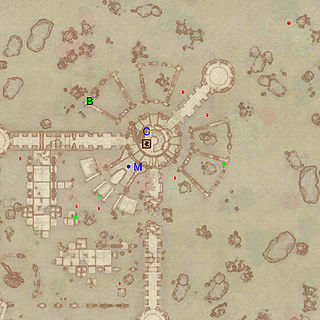
- This location's map marker (M on map) is named Miscarcand (editor name MiscarcandMapMarker). The entrance door is NE of the marker, 40 feet away.
- 0-7 Bitterfish Goblins are near the entrance
- 1 West Weald Bear is near the entrance
- 1 boss-level Chest 01 (Goblin variety) is at location B on map
- 1 Chest (contains 3 Scales, 10% chance low-quality armor, 10% low-quality weapon) is near the entrance
- 2 Chests 04 are near the entrance
- The following plants can be found near the entrance: 30 Alkanet plants, 1 Blackberry bush, 12 Columbine plants, 2 Elf Cup plants, 9 Flax plants, 9 Lady's Smock plants, 11 Morning Glory plants, 8 Motherwort plants, 20 Nightshade plants, 4 Peony plants, and 5 Viper's Bugloss plants
Zone 1: Miscarcand[edit]
There are two doors connecting this zone to the deeper levels of Miscarcand. The door that you need to use to reach the second level (Miscarcand, Sel Vanua) is door C. The other door (D) is immediately adjacent to the entrance, but is initially blocked by a hidden door (G); you are only likely to notice it if you look at your map. This door can only be accessed from the third zone (Miscarcand, Morimath), and provides an easy exit route once you have fully explored the dungeon.
To make it through this section (and reach door C), you will need to open the remotely locked gate at I. This requires jumping down from the elevated walkway, and following the passageway leading west out of the room. This leads to a smaller room containing the boss chest (B) and a "Push Block" on the wall which you can activate. This switch opens gate I. Heading up the stairs leads you back to gate F, where a pressure plate raises the gate.
The occupants of this zone include both Bitterfish Goblins and undead, who will be fighting each other (see notes). You can choose whether to join the battle, wait for it to finish and take on the survivors, or simply ignore the fight and carry on. At lower levels, the goblins typically win these fights; however, at higher levels the undead kill most of them, so prepare accordingly.
Occupants:
- 2 Skeletons (dungeon-specific leveled list, 1 level lower than standard; non-respawning)
- 1 Skeleton (dungeon-specific leveled list, 3 levels lower than standard; non-respawning)
- 3 Zombie Undead (dungeon-specific leveled list, 2 levels lower than standard; non-respawning)
- 1 Zombie Guardian (quest-specific leveled zombies; appear when you pick up the Great Welkynd Stone; non-respawning)
- 6 Bitterfish Goblins (non-respawning)
- 2 boss-level Bitterfish Goblins (non-respawning)
Treasure:
- 1 boss-level Ayleid Reliquary (Undead variety; locked) at location B on map
- 1 boss-level Chest 02 (Goblin variety; locked) at B
- 1 Chest (contains 3 Scales, 10% chance low-quality armor, 10% low-quality weapon)
- 1 Chest 03
- 1 Chest 04
- 1 Restoration Ayleid Chest
- 7 Welkynd Stones. Four of the stones are in brackets in the large southern room closest to door C; two are on the floor in the northern room closest to the entrance; and the final one is on the floor in the western room (near the boss chest B).
Doors and Gates:
- There are three doors in/out of this zone
- 1 door (at Out) leads outside
- 1 door (at C) leads to the zone Miscarcand, Sel Vanua
- 1 door (at D) leads to the zone Miscarcand, Morimath
- 2 Hidden Doors at G and H. Both are opened by the pressure plate (cyan dot on the map) south of H.
- 1 Iron Gate (opened remotely) at F, opened using the pressure plate (cyan dot) on the map on the west side of the gate.
- 1 Iron Gate (opened remotely) at I, opened using an activation "Push Block" (cyan dot) on the wall in the room with the boss chest (B). Note that pushing this block a second time will reclose the gate.
Other:
- 1 Dead Goblin (may carry a lockpick) at location J on map
Zone 2: Miscarcand, Sel Vanua[edit]
You will enter this zone through door C (from Miscarcand) and leave it through door E (to Miscarcand, Morimath). As in the first zone, there is a remotely opened gate (F) blocking access to the exit. This time, the activation switch is found in a corridor at the far south side of dungeon, accessible through either of two doorways at the south end (lower level) of the large central room.
In addition to the Varla Stone (V) in the first room, there is a boss-level Ayleid Coffer on the upper level of the large central room and a boss-level Ayleid Reliquary in the eastern room.
This zone contains goblins and undead, who will also tend to fight each other.
Occupants:
- 7 Skeletons (dungeon-specific leveled list, 1 level lower than standard; non-respawning)
- 1 Skeleton (dungeon-specific leveled list, 3 levels lower than standard; non-respawning)
- 5 Zombie Undead (dungeon-specific leveled list, 2 levels lower than standard; non-respawning)
- 5 Bitterfish Goblins (non-respawning)
- 2 boss-level Bitterfish Goblins (non-respawning)
Treasure:
- 1 boss-level Ayleid Coffer (Undead variety; locked) at location B on map (on upper level walkway of central room)
- 1 boss-level Ayleid Reliquary (Vampire variety; locked) at B (in eastern room)
- 1 Varla Stone (in a Varla Stone Cage) at V. The cage is opened using the activation block on the east wall of the same room (cyan dot).
- 1 Ayleid Cask 02 (locked)
- 3 Restoration Ayleid Chests
- 10 Welkynd Stones. Six of the Welkynd Stones are on pedestals at the north end of the large central room (bottom level); two are in alcoves on the west side of the central room (upper level); one is on the floor next to the boss ayleid coffer (B) in the central room; one is in an alcove on the south side of the varla stone (V) room.
Doors and Gates:
- There are two doors in/out of this zone
- 1 door (at C) leads to the zone Miscarcand
- 1 door (at E) leads to the zone Miscarcand, Morimath
- 1 Iron Gate (opened remotely) at F, opened using the activation block (cyan dot) in the passageway at the south end of the dungeon.
- 1 Iron Gate (opened remotely) at G, opened by stepping on the pressure plate (cyan dot) on its north side.
Zone 3: Miscarcand, Morimath[edit]
You will enter this zone through door E (from Miscarcand, Sel Vanua), and will exit through door D, which takes you straight back to near the entrance of the first zone. Door D can only be accessed after you pick up the Great Welkynd Stone. If you do not want to take the stone yet (see the notes about the repercussions of collecting this treasure before starting the related quest), you will need to return the way you came. If you took the Great Welkynd Stone during a previous visit there is another way to access Door D. You can save and then load the same save; then the hidden door at J will open. Once this hidden door opens you can follow the passage to D.
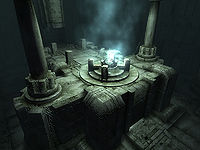
This zone contains the primary treasure of the dungeon: the Great Welkynd Stone at Q. It is on the upper level of the main room, accessible from the northern entrance to the room. There are also two boss chests. One of these boss chests is out of reach in the southeast corner of the main room; it can only be accessed if you have high enough acrobatics to jump up onto the ledge. The other boss chest is behind two hidden doors (J and I).
After you pick up the Great Welkynd Stone, several things happen:
- The hidden door at J opens, releasing the King of Miscarcand.
- Two Zombie Guardians appear on the lower level of the Great Welkynd Stone room.
- The three sets of stairs at K all rise up, allowing the aforementioned Zombie Guardians to run up the stairs and attack you.
The hidden door at J opens into a small room. Be careful when entering the room, because the pressure plate (cyan dot) immediately inside the entrance will open the hidden doors at G, H, and I, releasing one more enemy. To open the gate at F (and gain access to the shortcut back to the first zone), you can open the hard-level lock yourself, or you can kill the King of Miscarcand and loot the Miscarcand Key from his corpse.
Occupants:
- King of Miscarcand (appears when you pick up the Great Welkynd Stone; non-respawning) at location A on map. He is carrying the Miscarcand Key (opens gate F).
- 2 Zombie Guardians (quest-specific leveled zombies; appear when you pick up the Great Welkynd Stone; non-respawning)
- 8 Zombie Undead (dungeon-specific leveled list, 2 levels lower than standard; non-respawning)
Treasure:
- 1 Great Welkynd Stone at location Q on map
- 2 boss-level Ayleid Reliquaries (Undead variety; both locked) at B
- 3 Ayleid Casks 01 (1 locked)
- 2 Ayleid Casks 02 (1 locked)
- 3 Restoration Ayleid Chests
- 1 Welkynd Stone, located in an alcove in the small room accessed by door J
Doors and Gates:
- There are two doors in/out of this zone
- 1 door (at D) leads to the zone Miscarcand
- 1 door (at E) leads to the zone Miscarcand, Sel Vanua
- 1 Gate at F (locked, hard lock, opened by Miscarcand Key)
- 3 Hidden Doors at G, H, I. All three open when you step on the pressure plate at location A.
- 1 Hidden Door at J, opens when you pick up the Great Welkynd Stone
- 2 Gates leading into the main hall, which are initially unlocked but becomes locked (very hard) when you step on the pressure plate at location A.
Other:
- 3 Stone Steps (rise to form steps when you pick up the Great Welkynd Stone) at locations K on map


